Slimy Superfoods: West African Okra & Fish Stew

I love okra a lot.  I almost constantly crave the seductively silky slime that oozes between the bright bubble-like seeds of the tender pod.  There’s really nothing else like the texture of good, young, fresh, homegrown okra.  So when I saw it for $3.50 a pound at Greensgrow’s Saturday market (try $8 at some other farm standsI was all over it.  Nice combo of pretty green and purple varietals with dainty pods, which is good when you’re talking okra.  The longer the pod, the more likely it has grown woody.  These, though, looked perfect.

If my description of okra’s many fine qualities has you grimacing with disgust, keep in mind that it also happens to be a nutritional powerhouse, especially when it comes to healthy digestion.  The mucilaginous fiber contained in the pods is like compost for your poop.  It bulks, greases, detoxes, feeds your healthy probiotic gut bacteria…intestine heaven.  Look out for a blast of vitamin C, folate (a B vitamin that your red blood cells love), calcium and potassium too.  And with almost no accompanying calories, fat or cholesterol, this superfood is a golden ticket to health, weight loss, happiness, and, at $3.50 a pound, a fatter wallet too.

What better way to enjoy a superfood than with roots.  And those aren’t hard to come by for this little “finger” food.  Okra is a dietary staple from West Africa through the Sahara and across Asia to Japan.  It’s been part of local cultures for centuries…defining textural tastes (neba neba!)…thickening traditional dishes (gumbo’s got roots too)…supposedly even keeping Cleopatra’s skin free and clear of any unsightly acne.  Cool.

When it came time to turn my okra into dinner, I was so exhausted from lugging 40 lb bags of mushroom poop up three flights of stairs to my third story garden that all I could possibly take on was something relatively fast and super simple.  West Africa fit that bill.  Across this largely tropical coast, history and ecology have produced rich and entirely unique cuisines that also happen to rely on very few available resources and ingredients.  Simple food.  And sometimes fast.

Born was this uncomplicated and somehow deeply flavorful stew roughly based on the many varieties of ancestral gumbo cooked throughout West Africa, especially Senegal and Nigeria.  It was claimed that this may have been the best thing I have cooked in the past six months.  And not by me.  A great home for a great fruit.

NOTE: I would seriously encourage you to orchestrate some homemade stock into this dish.  As with all simple cooking, it’s the quality of the ingredients that truly matters.

West African Okra & Fish Stew

so easy, very healthy

serves 2 as a meal, 4 as not really a meal

  • shrimp stock (or any other stock) — homemade
  • pint or so okra, sliced into rounds — Greensgrow
  • kale (or any hearty green), roughly chopped — Fountain Farmers’ Market
  • white or yellow onion. roughly diced — Fountain Farmers’ Market
  • white stock fish (I used tilapia cause it’s what they had, but red snapper or mackerel might be better), rinsed and cubed — Whole Foods
  • peanut butter — Trader Joes
  • bay leaf — Whole Foods
  • cayenne (or red pepper flakes) — homeground
  • lime — El Zarape Grocery Store
  • large yam — Whole Foods
  1. Get started: in large soup/stock pot bring 4 cups stock, onion, bay leaf and okra to boil and let simmer for 10 minutes or until okra is softened but not mushy
  2. Meanwhile: boil yam until soft and then mash, with skin on
  3. Add other stuff: add 2ish tbs of peanut butter, a light dash of cayenne or red pepper and chopped greens
  4. Add fish: once greens are wilted and soft after about 5 minutes add fish cubes and continue to cook until just opaque, about 3 minutes
  5. Serve: squeeze lime over soup, serve with mash yam

Time & Place: Summer in Acadia with Maple Salmon, Sweet Corn, Pickled Blueberries, Crispy Corn Cake

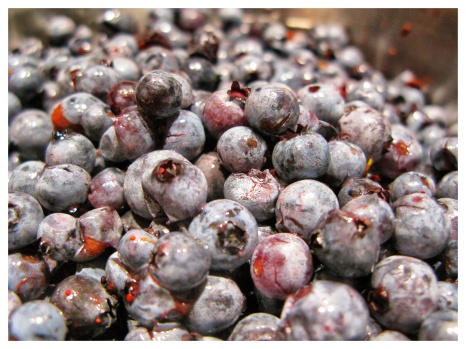
After an epic trip from Philadelphia to Prince Edward Island earlier this month (which I shall chronicle in brief, perhaps, later on), I found myself inundated with an unabashedly excessive quantity of wild Maine blueberries.  How can one resist those quiet green baskets so reminiscent of a season?  Especially in the throes of ones last moments in a place so blessed with gifts of wild fleshy ovaries?  Every vacation season needs a coattail…

Image

Facing excess and reminiscing on summertime in Maine and the maritime stretching north, I decided to give these wild blueberries an end fitting of their birth.  They would have a dish in homage to their season and their home.  And as I happened to have a rapidly-freezer-burning Atlantic salmon filet and some freshly arrived sweet corn from here in our own uniquely endowed region on hand, an Acadian theme came together quite naturally.

Acadia was a seventeenth century French colony that stretched from Prince Edward Island down through the maritime provinces of Canada and into Maine.  Nowadays, we’re talking culture.  Acadia isn’t so much a region as a way of life that was borne of a place and a time.  Unfortunate victims of European political conflict grappling with the combination of French blood and illiteracy while they struggled to learn as much as possible from the local native populations, Acadians were a pridefully self-sufficient people living simply from their land and no one else’s.  Begrudgingly happy, I’d like to believe.

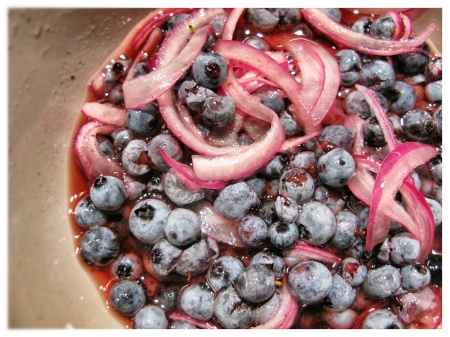
So I had some fun thinking about what might have made it to the table on a balmy mid-summer night in coastal Acadia.  I already had the blueberries.  And salmon.  And summer sweet corn (a secondary crop for most Acadian farmers).  Why not add a little maple?  And for some French flair, why not pickle those blueberries (side note: I don’t actually think pickling blueberries is French, it’s just always something I’ve wanted to do)?

Image

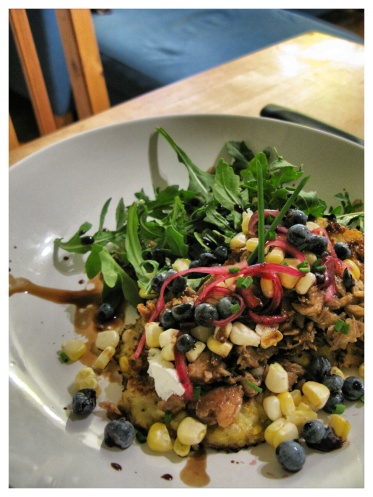
Out of nowhere, a delicious and almost wholly locally purchased meal emerged.  From the “French” tang of the pickled blueberry to the “three sisters” grit of a good corn meal cake to the richly traditional sweetness of the maple and the historical significance of the salmon, this hearty meal was reminiscent of a time and place I’d like to know better.

A note: I’ve decided that I want to feature WHERE all this tasty looking food comes from – because that’s just as if not more important than where it ends up.  I’ll be as honest as I can, integrity as a local food enthusiast to the wind.  So check out the ingredient list, and I’ll think you’ll find that it’s easier than it seems to live at least mostly off of your own land…or at least land that’s being respected elsewhere.

Image

Maple Salmon, Sweet Corn, Pickled Blueberries, Crispy Corn Cake

Can be gluten free.

Serves 2

  • salmon filet (skin-on) — Whole Foods
  • real dark maple syrup — purchased in Vermont
  • balsamic vinegar — my mother’s pantry…
  • 2 cloves garlic, minced — Savoie Organic Farm at Headhouse Farmers’ Market
  • an orange — Acme
  • mayonnaise (or vegan sub) — Whole Foods
  • 2 ears of corn — Fountain Farmers’ Market
  • 1 egg, separated — Fair Food Farmstand
  • milk (of any variety) — Whole Foods
  • yellow corn meal (can be gluten free) — Whole Foods
  • a few chives, finely chopped — my roof!
  • pickled blueberries *see below — purchased in Maine
  • baby arugula — Whole Foods (but soon will come from my roof!)
  • fresh goat cheese — Di Bruno Bros.
  1. Preheat oven: 400 degrees
  2. Whisk glaze: 1/4 cup maple syrup, 1/4 cup balsamic vinegar, 1/2 the minced garlic, and zest from 1/2 an orange or so
  3. Prep salmon: place skin-side down in baking-safe dish, coat with layer of glaze, squeeze juice from 1/2 orange over
  4. Reduce glaze: begin heating the remaining glaze over low heat until thickened slightly and caramelized (you can pull from here to baste salmon while baking)
  5. Strip corn: standing the ears on end in bowls, scrape the goodness off the sides with a sharp knife, retaining the juices/pulp (set aside 1/2 cup pretty kernels)
  6. Bake salmon: place in oven and cook 10-15 minutes, basting two or three times
  7. Assemble batter: place 1/2 cup corn kernels in large mixing bowl (for texture), chop remaining kernels either by hand or in food processor until well macerated then add to bowl as well. add remaining garlic, 3 tbs corn meal, a few pinches good salt, 1 tbs milk and egg yolk. mix. beat egg white until fluffy (a stiff foam will form and your hand will hurt), then fold into mixture
  8. Cook cakes: in greased skillet (using non-stick spray or a small amount of vegetable/canola oil) form “pancakes” about 3-4 inches in diameter and cook until crisp on the outside but still soft on the inside and drain on towel
  9. Pull salmon: when salmon is cooked through, but not dry, and rested for a moment or two, use a fork to flake the filet. add mayonnaise and more glaze as needed to keep quite juicy and moist.
  10. Plate: lay corn cakes on or next to arugula, top with pulled salmon, sprinkle reserved corn kernels, pickled blueberries* and goat cheese (crumbled), top with snipped chives and drizzled reduced glaze.

*Pickled Blueberries

  • white vinegar — Acme
  • brown sugar — Whole Foods
  • honey — Green Aisle
  • kosher salt — Acme
  • blueberries — purchased in Maine
  • red onion — Culton Organics at Headhouse Farmers’ Market
  1. Whisk 2 tbs vinegar, 1 tsp salt, 1 tsp brown sugar, few swizzles of honey…pour over 1 cup blueberries and how ever much thinly sliced red onion you’d like…let refrigerate overnight.

Okinawa-nt! I love Bitter Melon and Goya Chanpuru

As I head off for a long weekend of uber-indulgence in Colorado (think Freshcraft to Strange Brewing to Great Divide to Falling Rock to Oskar Blues to Lefthand to New Belgium to Odell’s to Funkwerks to…liver failure and a broken home?) I wanted to leave you with the recipe for my last supper before the storm.

In an attempt to set my body so straight that it can only get so out of whack, I “traveled” to Okinawa, Japan’s island prefecture famous for its inhabitants’ long lives and excellent health. I figured taking some cues from their kitchens might just lend me some of their resilience.

And this means I get to use one of my favorite funny looking produce items: bitter melon!  This bumpy fruit is prized among Okinawans and is often credited with, well, just about everything. Seriously this thing had been used by populations all over the world for centuries to treat ailments ranging from stomach pains to nema toads to measles to diabetes to dysentery to scabies to cancer to malaria to — get this — HIV. And there’s actually science behind it. Like whoa.

The one catch is, well, it’s bitter. Certainly an acquired taste. There are things you can do to reduce the astringency, but its got a bite no matter what. Me? I love it. My boyfriend? Not so much. But considering that its basically a miracle in a melon, don’t you think you should like it no matter what?

To really get at the heart of this amazing community of folks, I sprung for a foundational Okinawan dish: Goya Chanpuru. It’s basically the Okinawan version of bi bim bap or donburi — a meal in a bowl — but features traditional Okinawan ingredients. To go the extra mile, I served mine with boiled satsuma-imo, the purple-skinned Japanese sweet potato cultivar. It is often said that Okinawans love this yammy bugger so much that it is often eaten boiled and cubed in the place of rice — perhaps contributing to their overall health and well being. Doesn’t much matter though, because they’re delicious anyway!

To sum up how I feel about this dish, I was absolutely unable to follow the traditional Okinawan rule hara hachi bu. Putting down the chop sticks at 80% full? There was no way. I stuffed my face. Addictive.

Goya Chanpuru with Boiled Satsuma-Imo

Serves 2-3 (can be vegetarian, vegan, and/or gluten free)

  • 1 small bitter melon (select firm, yellow-green melons, about 5-6″ long)
  • 1/2 small yellow or white onion
  • 1/2 block of extra firm tofu
  • 1/2 can of tuna (for vegans use 1/2 cup cubed ham substitute or seitan)
  • 1 egg (for vegans use your favorite vegan egg scrambler substitute)
  • 1 large or 2 small Japanese sweet potatoes
Condiment Sauce
  • 2 tbs white miso (rice, buckwheat, or millet based if gluten free)
  • 2 tbs sake
  • 1/2 tbs sugar
  • 1 tsp tamari

Boil scrubbed potatoes in water until easily pierce-able with a fork (and then once cooled slightly have someone else cut them into cubes while you cook the chanpuru 🙂).

Meanwhile, whisk condiment ingredients together and set aside.

Also, crack the egg into a bowl, beat well and set aside.

Then, slice the bitter melon down the middle. Scoop out the seeds and most of the white innards. Slice into half moons about 1/8-1/4″ thick. Place the slices in a colander and sprinkle with salt. Let sit for 10 minutes (this will remove some of the bitterness).

Meanwhile, wrap tofu in a paper towel and press the water out. Wrap in a new sheet and place in microwave for 20-30 seconds. Press more water out. Wrap in new sheet and press one more time. Then cube!  About 1/2″ square.

Cut the onion into half moons.

Once 10 minutes has passed, pat the bitter melon dry with a paper towel.

Then start cookin’!

Coat the bottom of your saute pan or wok with non-stick spray, heat over medium and add egg. Let spread and cook until just firm, but still runny, and then set remove from pan and set aside – like a loose-y goose-y omelet.

Add 1-2 tsp of sesame oil to the same pan, let heat up and then add the bitter melon. Saute for a minute or two, then add onion. Saute for another minute or two, until just lightly softened and starting to brown. Add tofu cubes, continuing to move the whole mixture around your pan. Let saute for a few minutes, then add tuna (or vegan meat), incorporating well. Mix the egg back in, not being afraid to jostle tofu cubes. You don’t have to be gentle with this!

Lastly, slowly pour the condiment sauce around the rim of the pan and mix in.

Serve with the steamed satsuma-imo cubes your friend so nicely cut up for you.

Then, LIVE LONG AND PROSPER.

In Colorado.

Say Yes to New Mexican Posole

Part of the reason I’ve been out of commission, at least lately, was a visit from some long-lost world travelin’ New Mexican family. During this visit, though, despite the running around from Philadelphia institution to institution, I didn’t stop trying new things in the kitchen.  Just writing about it.

In fact, I got a little inspired. The combination of 1) my sad attempts to neaten the house, 2) a reminder of how amazing New Mexican cuisine is and 3) a guest’s encouragement to temporarily drop all concern for my vegan/carb-related instincts inspired me to tackle an ancient bag of hominy sitting in my cupboard — and with no nutrition-related hangups, which, you can probably tell, win me over a bit too often.

To give you some background, hominy is one of those staple foods that has basically kept entire peoples alive in Middle America up through the American west — much like cassava and other tubers have done in Sub-Saharan Africa. It’s basically just dried maize kernels with their germ and hull removed either mechanically or through a good soak in lye (yes, lye). This prevents the grain from sprouting during storage and makes them an excellent source of nutrition during cold winters when other foods are scarce.

And one of the most hearty, simple, down home ways to serve this heartwarming foodstuff is in posole – a rustic stew originating in Mexico, but most delicious (if I do say so myself) in New Mexico. And thanks to some encouragement from some real New Mexicans (boyfriend included) I didn’t try to alter this one. This is NOT vegan. This is NOT low fat. This is full of pork. And full of pork fat. As it should be.

So if you’re harboring any healthy-hangups in need of a good whack, and you have a day with some well-loved family around, run on down to any of the numerous Mexican grocers in the Italian Market for a bag of hominy. And be sure to grab a big ole’ pork butt while you’re down there. To make Posole.

New Mexican Posole

Serves 4

  • 1/2 pound dried hominy
  • 1 onion (half quartered, half diced)
  • 1 pound pork butt (aka shoulder etc)
  • 4 cloves garlic, minced
  • 1 tsp cumin
  • 1 tsp dried Mexican oregano
  • 1 bay leaf
  • 3-4 dried ancho chiles
  • salt, cayenne to taste

SOAK POSOLE: Soak the posole in a generous amount of water overnight. Drain and rinse.

PREPARE POSOLE: In a large pot add the posole and twice as much water as you have posole. Add quartered onion and about 1/2 tsp salt. Bring to a boil, reduce to simmer and let cook uncovered for 1 to 1 1/2 hours until the posole “blooms” or opens up like a pretty little flower. Add water if it begins to dry out.

MEANWHILE, PREPARE PORK: Place pork in another large pot and cover with water. Add diced onion, minced garlic, cumin, oregano, bay leaf, and salt/cayenne to taste. Bring to a boil, reduce heat to simmer, cover and cook until the pork is cooked through and fork tender, 1-2 hours. Remove the pork, let cool completely and then pull apart with a fork.

THEN, PREPARE CHILES: Remove chile stems (and seeds if you want your posole less spicy — booooring), and soak in 2 cups of the hot broth that the pork cooked in for 20 minutes. Blend broth and chiles to make a firey red paste.

COMBINE: Add the pork, remaining pork broth and chile paste to the posole. Continue to cook for another 1-3 hours, stirring occasionally and adding water if it looks to be drying out. It’s finished when the posole is fully bloomed and tastes slightly chewy but pleasantly tender.  Be careful not to let it cook too long or your broth will lose flavor!

Taste, adjust seasonings, and serve with any number of delicious toppings: cheddar cheese, lime wedges, chopped cilantro, minced onion, shredded lettuce or cabbage, diced avocado…whatever your heart desires!

SO GOD DAMN GOOD.

Cauliflower Steakhouse Dinner

I’ve been remiss of late. Letting my culinary pursuits hang silent, unsung. I’m all cloudy in the mind! Too foggy to get things down straight.

So as I slowly pick my way through the junky shit in my life, I’m going to ease back into the game with this very non-Emily lazy man’s post:

I found a recipe in Bon Appetit.

I made it.

It was easy.

It was delicious.

Cauliflower Steaks with Olive Relish & Tomato Sauce in A Cauliflower Steakhouse Dinner:

Served with fresh bread and lettuce. Your choice, ranch or italian.

The Scandinavian Cobb

This fun, made-up salad pretty quickly established itself as one of my favorite weeknight go-tos.  Super easy.  Super quick.  Super adaptable.  Delicious.  Refreshing.  Perfect for spring.

While I usually like to use slivered raw chard or beet greens and endive as the base for this lighthearted salad, this time around it features the first crop of mesclun from my rooftop garden.

Yay May!

Scandinavian Cobb Salad with Horseradish Vinaigrette

Serves 2

  • Greens of choice (slivered chard or beet greens, or a baby lettuce mix with a backbone)
  • Smoked salmon (I use TJs smoked salmon pieces, which are super cheap and do the job)
  • 1/2 a red onion
  • 1/4 of a grapefruit (could also be orange or any other citrus fruit)
  • An avocado
  • One egg per salad
  • Dill springs
  • Horseradish vinaigrette (see below)

Prepare your toppings: chop the salmon into bite size pieces, very thinly slice the red onion, segment the grapefruit (please watch this amazing video on how if you don’t know), and cube or slice the avocado.

Poach the eggs (I’m still not very good at this, but the general idea is that you break your room temperature eggs into separate small bowls, gently boil 1-2 inches of water in a nonstick skillet, add 1 tbs vinegar, drop each egg into the water very gently, use a spoon to fold the white in on itself if necessary, turn off the heat, cover, let sit for 4-5 minutes, then remove with a slotted spoon) and while you wait for the eggs to be finished dress the lettuce with your vinaigrette.

Plate your dressed lettuce, add prepared toppings and finish with a poached egg, dill sprig and nice crusty bread.

Horseradish Vinaigrette

  • 1-2 tbs minced shallot
  • 1 tsp honey
  • a pinch of sugar
  • 1-2 tbs white wine or champagne vinegar
  • 1-2 tsp lemon juice
  • 1-2 tsp dijon mustard
  • 1-3 tbs horseradish
  • 1-3 tbs plain yogurt or mayo
  • 1 tsp truffle oil (and optionally another 2-3 tsp of walnut oil or extra virgin olive oil)
  • salt & pepper

Combine the ingredients, blend or whisk well together, taste, adjust, use 🙂

Foundations in Epicureanism

I’m determined. A change will come soon to All Trees Have Roots.  No – not a change…an alignment.  That sounds better.  It’s time I sat down and really focused.

So what is the central thread here?  This is sort of what I’m thinking, on the “theory” end of things:

“I am really all that I’ve been looking for…your life will only be just what you want it for.”

http://soundcloud.com/liminal-kitsch/matthew-dear-deserter

Alien Fetus or Vegetable: Jerusalem Artichoke Soup

Ah the sunchoke. What an adorable little thing. Well, when you get one that happens to look like this:

Otherwise, they mostly just look like crippled alien fetuses.

Questionable looks aside, though, the sunchoke — or Jerusalem artichoke — is a wonderfully useful tuber that comes from the bottom of a lovely sunflower-like plant.  In fact, the use of the word Jerusalem in their name likely came from the english corruption of the italian word for the root: girasole, meaning sunflower.

These ugly little buggers are somewhat like a lightly-sweetened cross between a potato, a parsnip, and a rutabaga…all tinged with an earthy hint of artichoke and mushroom. The texture is a little bit like a potato, and a little bit like kohlrabi.  Mysterious.

Often recommended for diabetics, the sunchoke plant doesn’t produce starch like most root vegetables.  Instead, it produces inulin, a polysaccaride undigestible by humans, meaning the root doesn’t produce a spike in blood sugar levels like potatoes or other starchy plants.  This is great and good and the like – but do beware that this characteristic also means it can produce some heavy, unexpected and uncontrollable flatulence in some folks.  Too bad for them!

Further substantiating the resounding approval of the “science of the glycemic index,” the sunchoke contains high levels of potassium, iron, magnesium, fiber and a host of other useful nutrients.  And it’s a great food for the wonderful little microorganisms in your intestine that help you digest things, if not the tubor itself.

AND to reiterate from the beginning — they’re damn tasty!

Inspired by a magical soup concocted by the wonderful crew over at one of my favorite neighborhood haunts, Stateside, I decided to cook some Jerusalem artichokes up for myself.  And my boyfriend.  And boy did it turn out good.  And also boy was it easy.  Sunchokes are coming to a farmer’s market near you…so next time you notice an alien fetus lying next to the mizuna greens, pick up a pound or two.  And make some soup.  Or more specifically, make Jerusalem Artichoke Soup with Sage, Bay Scallops, Crispy Spring Parsnip & Mixed Mushrooms, Chili Oil (and a side of chili toasts).

Jerusalem Artichoke Soup

Sage, Bay Scallops, Crispy Spring Parsnip & Mixed Mushroom, Chili Oil

gluten free, optionally vegan/vegetarian

Serves 2

  • 1 lb sunchokes
  • 1 parsnip
  • handful of small wild mushrooms (shiitake, oyster, maitake, etc.)
  • 1 stalk celery
  • 1 shallot
  • 1 clove garlic
  • a lemon
  • 1/4 cup white wine (preferably dry)
  • 2 1/2 cups vegetable broth or stock
  • 1/4-1/3 cup grass fed milk or organic soymilk
  • sage (fresh or dried)
  • salt & pepper
  • bay scallops (as many as you want)*
  • liquid smoke (optional – but delicious)
  • chili oil (optional – but delicious)
*(to make this recipe vegetarian/vegan try the tofallops from this recipe!)
  1. ROAST PARSNIP: Chop 1/2 of the parsnip into small chunks.  Toss with non-stick spray and a few drops of liquid smoke, if you have it.  Roast in the oven at 400 degrees for 15-20 minutes or until they’re toasty brown.
  2. PREPARE VEGGIES: Meanwhile, chop the celery and shallot, and crush the garlic clove. Rinse the sunchokes under cold water, scrubbing well with a brush. Chop into small chunks (don’t peel them) and toss with the juice from 1/2 the lemon (they oxidize quickly so don’t wait!).
  3. COOK THE VEGGIES: Heat a non-stick spray coated soup pot and add your celery and shallot. Saute until browned.  Add garlic and saute a minute more.  Add sage – about 1-2 tsp crushed up dried or 1-2 tbs chopped fresh.  Allow sage to become fragrant and then add chopped sunchoke and saute for another minute or two.  Add white wine, salt & pepper and allow to cook down for a few minutes, scraping any brown bits off the bottom of the pan.  Add 2 cups of the broth/stock and bring to a boil.  Reduce to simmer for 20-30 minutes or until sunchokes are tender.
  4. CRISP YOUR CHIPS: Meanwhile, slice the remaining parsnip into very thin rounds and slice your mushrooms into very thin slices (unless they are very small in which case you can just leave them whole).  Arrange on a non-stick-spray-coated baking sheet and top with a little bit of dried sage, salt & pepper.  Bake at 400 degrees until crisp (watch them closely and flip if necessary!).  When crisp, let them sit on a paper towel to “dry.”
  5. BLEND YOUR SOUP: Once sunchokes are tender, add in the roasted parsnips from above and blend your soup with a high-powered blender if possible and a hand blender if not.  Finish the soup with the soymilk and a squeeze of lemon juice (but feel free to add more broth/stock if the soup needs thinning).
  6. STEAM YOUR SCALLOPS: Place bay scallops in a steaming basket (or a strainer stuffed into a sauce pan, like I use), and steam over boiling water for about 3-5 minutes or until just firm.
  7. PLATE: Place scallops in the center of your bowl, pour the soup around, top with crisps, and drizzle with chili oil.
  8. SERVE WITH: chili toasts (aka drizzle some chili oil on nice bread and toast under the broiler until crisp!).

When March Gets Confusing: Raw Winter Salad with Maple-Thyme Vinaigrette

The flu is not fun.

After spending literally an entire week incapacitated on the couch with no actual mental activity occuring, the journey drifting back down to lucidity has been long and slow.  Now, two weeks later, I am just beginning to feel normal again.  I can communicate with others, get myself from place to place — I’m even starting to find pleasure in things again!

With the return of consciousness has come a desperate need to delicately rehabilitate my ravaged body.  That nasty bug certainly took a toll on my energy levels and mood.  The answer: an easy to prepare, nutrition-packed power meal to fuel the body without weighing it down.  A foggy trip to the farmer’s market over the weekend meant it was in the cards – but also that it would have to be TOTALLY inappropriate for the coming spring, as my half-conscious self decided to pick up the dregs of winter’s bounty.

So next time you’re so disoriented from a passing illness that you don’t know what season it is, but you’re desperately tired of chicken broth and applesauce, try this on for size: Raw Winter Salad with Maple-Thyme Vinaigrette.

Raw Winter Salad with Maple-Thyme Vinaigrette

gluten free, vegetarian, optionally raw

Serves 2

  • 1 bunch kale (lacinato or red russian are great choices)
  • 1 parsnip
  • 1/2 a sweet potato
  • 1/2 pint of mixed mushrooms (oysters are especially great)
  • 1/2 package of tempeh*
  • currants
  • walnuts
  • raw aged cheese (I used a local PA gem, Hillacre’s Arcadia)
  • Maple-Thyme Vinaigrette (see below)
  1. Gather your kale into a bunch and roll long-ways as tightly as you can into a sort of cigar shape. Slice VERY thinly down the cigar so you get very slim slivers.
  2. Using a mandolin (preferably) or a very sharp knife, slice the parsnip into extremely thin rounds.  Cut the sweet potato in half lengthwise, and then use the mandolin to slice into very thin half-moons.  Cut the tempeh into similarly thin strips.
  3. Using a very sharp knife, slice mushrooms very thinly.
  4. Mix all of the above with your vinaigrette, top with currants, roughly chopped walnuts and shaved cheese.
  5. Easy peasy no cook yum!
Maple-Thyme Vinaigrette
  • 2 tbs minced shallot
  • 2 tbs white wine vinegar
  • 2-4 tsp maple syrup (the real kind)
  • 1-2 tsp lemon juice
  • Handful of soaked cashews (if you don’t have a high powered blender, sub yogurt or mayo)
  • dried thyme to taste
  • Salt and pepper, to taste
  • water or broth as necessary to reach desired texture
  1. Blend or whisk thoroughly together, taste, adjust, use 🙂
*Tempeh’s status as a raw food is contested. It is made of fermented soy beans, and some raw diets include fermented foods, while others do not. Up to you what you want to do!